Butterfly魔改日记
安装Butterfly主题
去到Butterfly GitHub主页,在博客根目录运行以下命令:
1 | git clone -b master https://github.com/jerryc127/hexo-theme-butterfly.git themes/butterfly |
完成后,在_config.yml中更改theme为Butterfly(当前的版本为4.5.1),到此还不能够成功启动hexo,硬要启动会报以下错误:
1 | extends includes/layout.pug block content include ./includes/mixins/post-ui.pug #recent-posts.recent-posts +postUI include includes/pagination.pug |
需要先安装以下依赖:
1 | npm install hexo-renderer-pug hexo-renderer-stylus --save |
运行hexo三件套,hexo成功启动.
Note:在Mac或者Linux中如果想要更改某个文件夹下所有文件的权限,运行
1 | chmod -R 777 文件夹名 #R必须大写 |
添加加载动画
博客里有一些图片比较大,进人到博客后还没有完全加载出来,这样很不好看,所以我想做一个加载动画.
参考原帖在这里,注意Butterfly主题的版本是*4.5.1.*
修改
themes/butterfly/layout/includes/loading/fullpage-loading.pug1
2
3
4
5
6
7
8
9
10
11
12
13
14
15
16
17
18
19
20
21
22
23#loading-box(onclick='document.getElementById("loading-box").classList.add("loaded")')
.loading-bg
div.loading-img
.loading-image-dot
script.
const preloader = {
endLoading: () => {
document.body.style.overflow = 'auto';
document.getElementById('loading-box').classList.add("loaded")
},
initLoading: () => {
document.body.style.overflow = '';
document.getElementById('loading-box').classList.remove("loaded")
}
}
window.addEventListener('load',()=> { preloader.endLoading() })
if (!{theme.pjax && theme.pjax.enable}) {
document.addEventListener('pjax:send', () => { preloader.initLoading() })
document.addEventListener('pjax:complete', () => { preloader.endLoading() })
}修改
themes/butterfly/layout/includes/loading/index.pug1
2
3
4
5
6
7if theme.preloader.source === 1
include ./fullpage-loading.pug
else if theme.preloader.source === 2
include ./pace.pug
else
include ./fullpage-loading.pug
include ./pace.pug新建
source/css/progress_bar.css, 也可以不做这一步下面配置文件pace_css_url这一项就要留空, 这一步是修改 pace 加载的胶囊样式用的.1
2
3
4
5
6
7
8
9
10
11
12
13
14
15
16
17
18
19
20
21
22
23
24
25
26
27
28
29
30
31
32
33
34
35
36
37
38
39
40
41
42
43
44
45
46
47
48
49
50
51
52
53
54
55
56
57
58
59
60
61
62
63
64
65.pace {
-webkit-pointer-events: none;
pointer-events: none;
-webkit-user-select: none;
-moz-user-select: none;
user-select: none;
z-index: 2000;
position: fixed;
margin: auto;
top: 10px;
left: 0;
right: 0;
height: 8px;
border-radius: 8px;
width: 4rem;
background: #eaecf2;
border: 1px #e3e8f7;
overflow: hidden;
}
.pace-inactive .pace-progress {
opacity: 0;
transition: 0.3s ease-in;
}
.pace .pace-progress {
-webkit-box-sizing: border-box;
-moz-box-sizing: border-box;
-ms-box-sizing: border-box;
-o-box-sizing: border-box;
box-sizing: border-box;
-webkit-transform: translate3d(0, 0, 0);
-moz-transform: translate3d(0, 0, 0);
-ms-transform: translate3d(0, 0, 0);
-o-transform: translate3d(0, 0, 0);
transform: translate3d(0, 0, 0);
max-width: 200px;
position: absolute;
z-index: 2000;
display: block;
top: 0;
right: 100%;
height: 100%;
width: 100%;
background: linear-gradient(-45deg, #ee7752, #e73c7e, #23a6d5, #23d5ab);
animation: gradient 1.5s ease infinite;
background-size: 200%;
}
.pace.pace-inactive {
opacity: 0;
transition: 0.3s;
top: -8px;
}
@keyframes gradient {
0% {
background-position: 0% 50%;
}
50% {
background-position: 100% 50%;
}
100% {
background-position: 0% 50%;
}
}修改
themes/butterfly/source/css/_layout/loading.styl, 其中的颜色可以替换成你喜欢的色值。1
2
3
4
5
6
7
8
9
10
11
12
13
14
15
16
17
18
19
20
21
22
23
24
25
26
27
28
29
30
31
32
33
34
35
36
37
38
39
40
41
42
43
44
45
46if hexo-config('preloader')
.loading-bg
display: flex;
width: 100%;
height: 100%;
position: fixed;
background: var(/* 这里替换成你的色值 */);
z-index: 1001;
opacity: 1;
transition: .3s;
#loading-box
.loading-img
width: 100px;
height: 100px;
border-radius: 50%;
margin: auto;
border: 4px solid #f0f0f2;
animation-duration: .3s;
animation-name: loadingAction;
animation-iteration-count: infinite;
animation-direction: alternate;
.loading-image-dot
width: 30px;
height: 30px;
background: #6bdf8f;
position: absolute;
border-radius: 50%;
border: 6px solid #fff;
top: 50%;
left: 50%;
transform: translate(18px, 24px);
&.loaded
.loading-bg
opacity: 0;
z-index: -1000;
@keyframes loadingAction
0% {
opacity: 1;
}
100% {
opacity: .4;
}
在
[BlogRoot]/source/css/下创建一个custom.css的文件,在该文件中添加如下代码:1
2
3
4.loading-img {
background: url(/* 这里填你博客头像的地址 */) no-repeat center center;
background-size: cover;
}修改
_config.butterfly.yml中preloader选项, 改完以后source: 1为满屏加载无pace胶囊,source: 2为pace胶囊无满屏动画,source: 3是两者都启用。1
2
3
4
5
6
7
8
9
10# Loading Animation (加载动画)
preloader:
enable: true
# source
# 1. fullpage-loading
# 2. pace (progress bar)
# else all
source: 3
# pace theme (see https://codebyzach.github.io/pace/)
pace_css_url: /css/progress_bar.css记得要在
_config.butterfly.yml中添加inject1
2
3
4inject:
head:
# 自定义css
- <link rel="stylesheet" href="/css/custom.css" media="defer" onload="this.media='all'">向博客中添加图片,并且能够在Typora和网页中都能正常显示
问题描述:在Typora中插入图片时使用的是相对路径,该并不能够被hexo识别,导致启动hexo的时候文章内的图片没有办法正常显示.反过来如果使用了hexo能够识别的图片路径,在Typora中又不能够浏览图片了.
解决办法:
将
_config.yml中post_asset_folder:设置为true,在新建文章时hexo会自动生成一个和文章同名的文件夹存放文章中的图片.调整Typora中的设置
安装插件
1
2
3
4
5npm install hexo-renderer-marked #不推荐,这一个包可以不安装
npm install hexo-image-link --save
npm uninstall hexo-renderer-marker --save #卸载 marked
npm install hexo-renderer-markdown-it --save #安装markdown-it
Note:如果想要给文章添加封面,可以在scaffold文件夹的post.md中更改一下文章的模板
1 | title: {{ title }} |
将封面的连接填在cover后面,如果封面图片在本地就直接填封面图片的文件名.
添加本地搜索
1 | npm install hexo-generator-searchdb --save |
在_config.yml中添加
1 | Search |
将_config.butterfly.yml中localsearch的enable改为true
设置文章永久化连接
1 | npm install hexo-abbrlink --save |
统计字数阅读时间
1 | npm install hexo-wordcount --save |
更改_config.butterfly.yml中的代码
1 | wordcount: |
自定义网站样式
挖坑:了解CSS的工作原理
在[BlogRoot]/source/css/custom.css中添加如下代码:
1 | /* 颜色 */ |
如果不需要一图流,删除上面代码中的:
1 | /* 页脚透明 */ |
我感觉一图流更好看一些,同时不要忘记在_config.butterfly.yml中background属性后添加背景图片的地址.
给网站添加页脚徽标和计时器
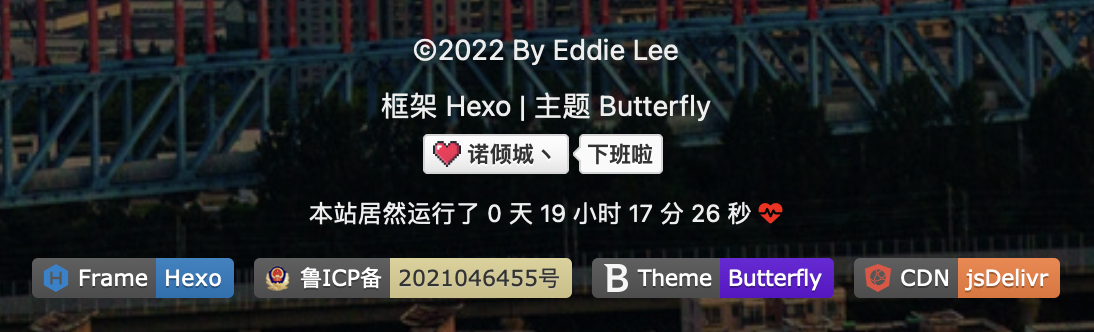
徽标我们在很多GitHub项目的主页中也会看到,比如:
推荐一个徽标生成网站,但是比较可以的是徽标的label部分底色修改不了。不过我们可以自定义图标,步骤如下:
1.找到合适的图片,尽量不要太大,背景透明,然后存储png格式。
2.找个在线转base64图片的网站,推荐这个在线生成Base64的网站,把制作好的图片转为base64链接。
3.把base64链接作为logo填进徽标链接,比如这样:
1 | https://img.shields.io/badge/EddieLee-下班啦-d021d6?style=&logo=<生成的base64编码> |
将上面生成的链接使用Chrome浏览器打开,用Safari打开有时会抽风显示不出来。将打开的页面下载下来,下载下来的是一个svg文件,将这个文件放到/img目录下,方便索引。
在Terminal中安装依赖:
1 | npm install hexo-butterfly-footer-beautify --save |
在_config.butterfly.yml中添加:
1 | footer_beautify: |
计时器部分的两个文件:在博客根目录下的source文件夹下新建/runtime/runtime.css和js/runtime/runtime.js文件,填入以下内容:
1 | /* runtime.js */ |
1 | /* runtime.css */ |
使用VSCode的插件JS & CSS Minifier (Minify)生成runtime.min.css和runtime.min.js文件。
添加站点动态Title
在[BlogRoot]/source/js/下新建title.js,填入以下代码,注意要在主题配置文件中Inject
1 | //动态标题 |
添加外挂标签
1 | https://www.npmjs.com/package/hexo-butterfly-tag-plugins-plus |
使用方法参考:https://akilar.top/posts/615e2dec/
安装wowjs
需要解决的问题碰到了问题:
我在给个人简介的侧边栏加上变色的效果后,这一个卡片的载入动画就不受控制了,和其他的板块格格不入,除了个人信息卡处的动画不受控制以外,Git Calendar的加载动画也不受控制.需要解决
1 | npm install hexo-butterfly-wowjs --save |
添加配置项
1 | # wowjs |
魔改关于页面
添加打赏功能
外挂标签的使用
添加GitCalendar
在侧边栏添加电子时钟
添加Butterfly Swiper插件
适配B站视频
在文章中添加B站的视频
将下面的代码直接复制到你想要添加视频的博客中去,替换掉aid后面那一串字符.注意,如果你的视频ID是BV开头,那么要把aid替换成bvid
1 | <div align="center" class="aspect-ratio"> |
在source/css/custom.css中添加以下代码
1 | /*哔哩哔哩视频适配*/ |
存在Bug
文章目录无法跳转
打开浏览器的开发者模式,toc-link并没有生成,所以没有办法实现跳转,解决办法:
安装插件:
1 | npm install markdown-it-named-headings --save |
然后进入项目的根目录,修改根目录下 node_modules\hexo-renderer-markdown-it\lib\renderer.js 文件,在 renderer.js 中添加一行以使用此插件:
1 | parser.use(require('markdown-it-named-headings')) |
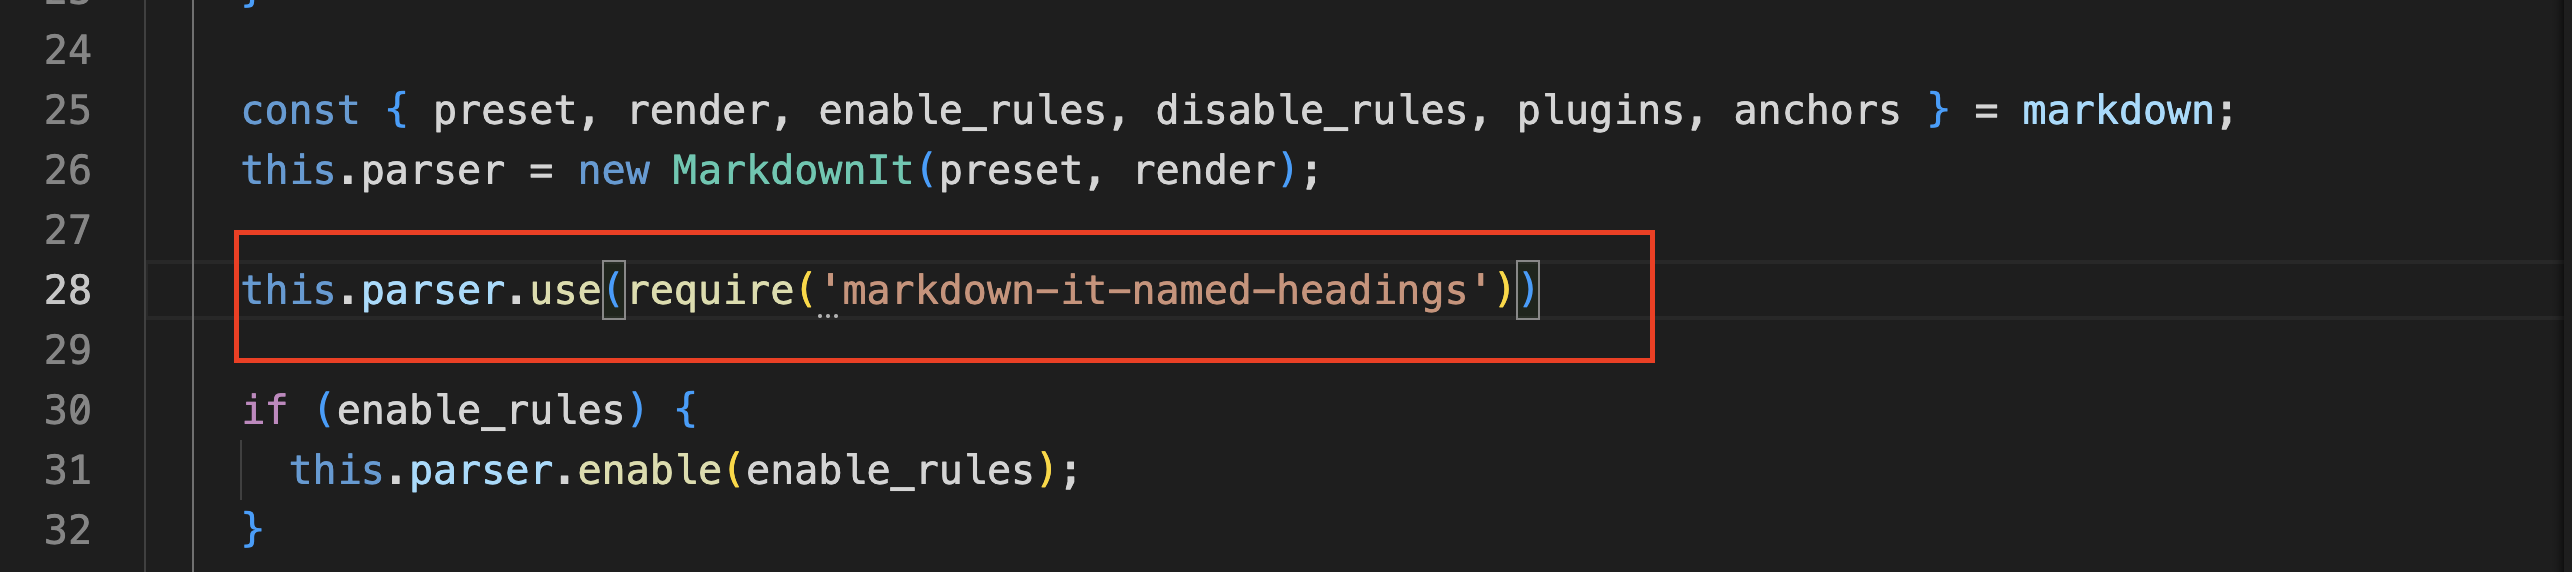
因为.gitignore忽略了node_modules中的修改,所以在新的设备上git pull下来之后还要手动地添加上面这一行才可以